Choosing the Best White Screen Printing Ink
White ink is one of the most important products in a textile screen printing shop, and often the most challenging to print consistently. A properly selected white produces a clean, bright, professional print. The wrong white—or the right white on the wrong garment—can be difficult to print, feel heavy, fail to cover the fabric, or allow garment dye to migrate into the finished design.
Choosing the best white screen printing ink is not simply a matter of finding the brightest or thickest ink available. The right choice depends on several factors:
- Garment fabric and dye stability
- Whether the white is an underbase or highlight white
- Required bleed resistance
- Cure temperature
- Mesh count and stencil thickness
- Flash and dryer performance
- Desired opacity and hand feel
- Production speed and print method
White ink should be viewed as part of a complete printing system. The ink, screen mesh, emulsion, squeegee, off-contact, flash settings, dryer temperature, and garment all work together to determine the final result.
There is no single white ink that is best for every garment and every job. The best white is the one that performs reliably for the application in front of you.
Important performance characteristics include:
- Opacity: Covers the garment color without requiring excessive print strokes or layers.
- Printability: Clears the selected mesh without requiring excessive squeegee pressure.
- Body: Holds detail and resists spreading while still printing smoothly.
- Fiber matte-down: A good underbase flattens garment fibers and provides a smooth surface for the colors above.
- Soft hand: The cured print does not feel unnecessarily thick or rubbery.
- Bleed resistance: On polyester and certain blends, reduces the movement of garment dye into the printed image.
- Reliable cure: The entire ink deposit reaches the manufacturer's required cure temperature under real production conditions.
- Wash durability: Remains flexible and holds up through laundering when used as intended.
Many professional printers keep more than one white on hand—one for cotton, another for polyester or unstable dyes, and a lower-cure white for blends and heat-sensitive garments. Some shops also stock a separate highlight white for jobs where brightness and fine detail matter more than heavy coverage.
Start With the Garment
The garment should be the first consideration when choosing white ink. A white that performs well on a heavyweight cotton shirt may not provide enough bleed resistance for polyester. A low-cure white ideal for a cotton/polyester blend may be unnecessary on a stable 100% cotton garment. Sublimated polyester may require a blocker layer before any white is printed.
Consider:
- Fiber content
- Garment color
- Dye stability
- Fabric texture
- Whether the garment has been overdyed or sublimated
- Whether it is sensitive to heat
- The expected wash and wear conditions
Even garments with the same listed fiber content can perform differently, because manufacturers use different dyes, finishes, and production processes. For that reason, the actual production garment should always be tested before you commit to a full run.
Quick White Ink Selection Chart
| Garment Type |
Primary Concern |
Recommended Starting Point |
Blocker Usually Needed? |
100% cotton
|
Opacity, fibers and hand feel
|
Cotton or all-purpose white
|
No
|
Cotton/polyester blend
|
Possible dye migration
|
Low-bleed or low-cure white
|
Sometimes
|
Stable 100% polyester
|
Dye migration and heat sensitivity
|
Polyester low-bleed white
|
Usually not, but always test
|
Unstable or unknown polyester
|
Severe dye migration
|
Polyester white over a blocker
|
Often
|
Sublimated polyester
|
Extreme dye migration
|
Dedicated blocker with polyester white
|
Usually
|
Overdyed or customer-supplied garment
|
Unknown dye stability
|
Production test before approval
|
Possibly
|
Use this chart as a starting point, not a guarantee—two garments with the same fiber content can react very differently under heat.
Understanding Bleed Resistance and Dye Migration
Dye migration occurs when dyes in a polyester garment become mobile under heat and move into the printed ink film. It is most common with polyester, performance fabrics, sublimated garments, and some cotton/polyester blends.
Most polyester dyes are unlikely to migrate at garment temperatures below approximately 265°F. The risk increases significantly above 300°F, although some unstable dyes may begin migrating at lower temperatures. Because dye quality varies from garment to garment, the actual production garment should always be tested.
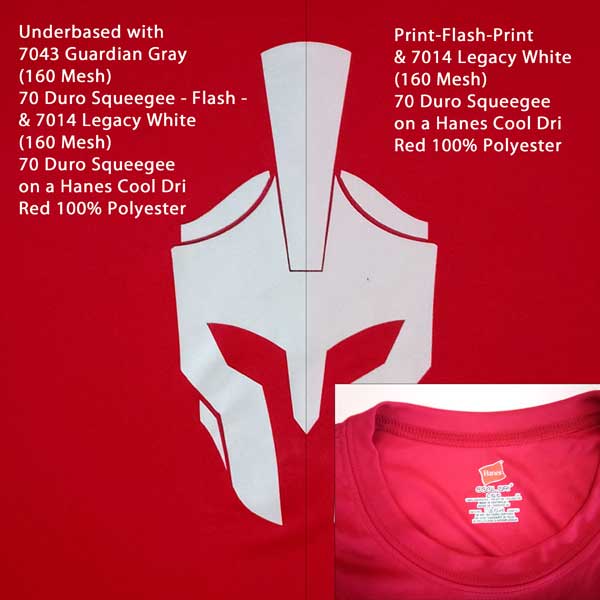
A white print on a red, maroon, or overdyed polyester garment may develop a pinkish tint after curing—or after sitting overnight. This does not necessarily mean the ink is defective or undercured. It often means heat from flashing or curing activated the garment dye and allowed it to migrate into the white.
|
|
Dye migration can be influenced by:
- Garment fiber content
- Type and stability of the garment dye
- Cure temperature
- Time spent under heat
- Excessive flash temperature or dwell time
- Thickness of the ink deposit
- Whether a blocker ink was used
- How long the garment sits after printing
Bleed-resistant inks are designed to reduce dye migration, but they cannot guarantee success on every garment. Some polyester dyes are extremely unstable and may require a dedicated blocker system, a lower-temperature cure, or both.
Low-cure is not the same as low-bleed. Low-cure describes the temperature required to cure the ink. Low-bleed describes the ink's ability to resist garment dye migration. An ink may offer one property without the other—so when your job needs both, confirm the ink provides both.
The Hidden Risk of Overdyed Garments
Overdyeing occurs when an already-dyed garment is dyed again to create a different finished color. An originally red garment might be dyed navy, for example. The finished garment appears navy, but the original red dye can remain beneath the surface. During flashing or curing, that underlying dye can become active and migrate into the white, often giving the finished print a pinkish tint.
Overdyed garments are not always identified by the supplier, which makes testing especially important when printing:
- Closeout or bargain garment lots
- Fashion colors
- Customer-supplied garments
- Unfamiliar garment brands or styles
- Polyester and performance apparel
- Garments with questionable dye stability
Whenever possible, run a production-style test on the actual garment: print and cure under normal conditions, let it sit, and inspect again after 24 to 48 hours. Dye migration does not always appear immediately after the shirt exits the dryer.
Best White Ink for 100% Cotton
Cotton is generally the easiest fabric to print with white plastisol, because it does not carry the dye-migration concerns of polyester.
For 100% cotton, look for a white that offers:
- High opacity
- Smooth printability
- Good fiber matte-down
- A soft hand when printed correctly
- Good detail retention
- Compatibility with your preferred mesh counts
- Reliable curing in your conveyor dryer
On dark cotton garments, white is often used as an underbase beneath other colors, and here the surface of the underbase matters as much as its opacity. A rough or heavily textured underbase makes the top colors look dull, uneven, or grainy. A smooth white underbase provides a consistent surface and improves the brightness and definition of the colors printed over it.
Cotton and Fibrillation
Fibrillation occurs when cotton fibers rise through the ink film, especially after washing, making a print look faded or fuzzy even though the ink remains attached to the garment.
Factors that help reduce fibrillation include:
- A white with good fiber matte-down
- Proper off-contact
- A sharp, properly exposed stencil
- An adequate ink deposit
- Controlled flashing
- Avoiding excessive squeegee pressure
- Using a smoothing or matte-down screen when necessary
Ink selection matters, but print technique and garment quality play major roles as well.
Best White Ink for Cotton/Polyester Blends
Blended garments can be harder than they appear. A shirt may feel like cotton while containing enough polyester to create dye-migration problems.
Common examples include:
- 50/50 cotton/polyester shirts
- Triblends
- Fashion fleece
- Heathered garments
- Performance blends
- Cotton-rich garments with a smaller percentage of polyester
For blends, choose a white with the low-bleed and/or low-cure properties required for the garment. A lower curing temperature reduces the heat applied to the garment, which can reduce activation of the polyester dye. But low cure does not automatically prevent dye migration—if the garment dye is unstable, a stronger bleed-resistant ink or a blocker layer may still be required.
Best White Ink for 100% Polyester
Polyester is where white ink selection becomes especially important. For 100% polyester garments—athletic jerseys, performance shirts, hoodies, and sublimated apparel—choose a white formulated specifically for polyester or dye-blocking applications.
A polyester white should provide:
- Strong bleed resistance
- A lower cure temperature when possible
- Good opacity
- Flexibility and stretch
- Reliable printability
- Compatibility with blocker systems when necessary
High-risk garment colors often include red, maroon, royal blue, navy, forest green, black, and bright sublimated patterns. Garment color alone does not determine risk, though—dye quality and manufacturing history matter just as much. On difficult polyester garments, white alone may not be enough, and a blocker ink may be needed to create a barrier between the garment dye and the visible white.
Using Blocker Ink Under White
A blocker ink reduces the movement of garment dye into the visible print layers. Gray blockers are common, though blocker colors and chemistry vary by ink system. The blocker is normally printed first and is not intended to remain visible in the finished design.
A common print sequence for difficult polyester garments:
- Print the blocker layer.
- Flash until the surface is gelled.
- Print the white underbase over the blocker.
- Flash again if required.
- Print highlight white or additional colors.
- Cure the complete ink system according to the manufacturer's requirements.
Avoid overheating the blocker during flashing—excessive heat can activate more garment dye and reduce adhesion between layers. A blocker also adds ink deposit and may increase the hand of the print, so use it when the garment risk justifies it rather than as a default on every job.
Standard-Cure, Low-Cure, and Wide-Cure-Range Whites
Cure requirements are a core part of white ink selection. If plastisol is undercured, it may crack, wash out, remain tacky, or fail prematurely. If the garment sees too much heat, it may shrink, scorch, ghost, distort, or show increased dye migration. Always follow the cure specification for the exact ink you're running, and verify the temperature of the complete ink deposit—not just the dryer chamber or belt setting.
The temperatures below are common industry ranges and should be used as general guidance. Always follow the technical data sheet for the specific ink being printed, because cure requirements vary by product.
Standard-Cure White Ink (Typically 300–320°F)
Standard-cure white is a dependable everyday choice for cotton and other low-risk garments. It is commonly used when:
- Printing 100% cotton
- Dye migration is not a concern
- The dryer is already set up for conventional plastisol
- A dependable underbase or spot white is needed
- Heat sensitivity is not a major issue
Standard-cure whites deliver excellent opacity and wash durability when the full ink deposit reaches the required cure temperature.
Low-Cure White Ink (Typically 260–280°F}
Low-cure white is formulated to reach full cure at a lower temperature than conventional plastisol. It may be useful when:
- Printing polyester or cotton/polyester blends
- Working with performance garments
- Reducing the chance of dye migration
- Printing heat-sensitive fabrics
- Limiting garment shrinkage or scorching
- Printing fleece or fashion garments
Low-cure ink still needs testing. Lower cure temperature reduces heat exposure, but it does not by itself guarantee bleed resistance on unstable garments.
Wide-Cure-Range White Ink (Typically 275–325°F)
Wide-cure-range inks are formulated to cure across a broader temperature window. This allows a shop to select a cure temperature that better matches the garment while also printing alongside compatible ink systems with different cure requirements.
International Coatings offers FlexCure™ technology on many of its ink systems. FlexCure™ inks can be cured from 275°F to 325°F, allowing the same ink to be used for both lower-temperature and standard-cure production.
A wider cure window may help when:
- Printing multiple garment types
- Alternating between cotton and blends
- Simplifying production
- Reducing the number of specialty whites in inventory
- Running jobs that require different cure conditions
A flexible cure range does not eliminate the need for testing—garment dyes, dryer airflow, dwell time, and ink-deposit thickness can all still affect the result.
Best Mesh Counts for White Screen Printing Ink
White ink is generally more heavily pigmented and higher in viscosity than many standard colors, so mesh count has a major effect on opacity, detail, ink deposit, and hand feel.
86 to 110 Mesh
Provides a heavier ink deposit. Often used for bold white prints, heavy underbases, athletic garments, blocker inks, and high-opacity applications. The heavier deposit improves coverage but can produce a thicker hand and require more heat energy to cure completely.
125 to 160 Mesh
A versatile range for many white underbases and spot-color prints, offering a practical balance of opacity, printability, detail, surface smoothness, and cure efficiency. The exact mesh should depend on the ink, artwork, thread diameter, stencil thickness, and desired deposit.
180 to 200 Mesh
Produces a thinner, smoother deposit. Appropriate for fine details, highlight white, softer-hand printing, smoother underbases, wet-on-wet applications, and halftone work. Because less ink is deposited, opacity depends more heavily on the ink's formulation and your technique.
230 Mesh and Higher
Generally used for fine detail, halftones, highlight white, thin deposits, and specialty applications. Typically not the first choice when maximum white coverage is required.
For more, see the Atlas Screen Printing Mesh Count Chart and Guide.
Underbase White vs. Highlight White
White ink can perform different functions within the same design.
Underbase White
An underbase is printed beneath other colors to create a neutral, consistent surface on a dark garment. A good underbase should be smooth, consistent, opaque enough for the design, properly flashed, detailed enough to avoid spreading beyond the top colors, and thick enough to support the print without adding unnecessary hand.
An underbase does not always need to be the brightest possible white, since much of it may be covered. But balance matters: too thick and the print feels heavy, too thin and the top colors look muted, too rough and the colors above lose brightness and detail.
Highlight White
Highlight white is generally printed later in the sequence and remains visible in the finished artwork. Because it is meant to be seen, it should offer brightness, clean color, smoothness, fine detail, and good opacity at the selected mesh count. Highlight white is often printed through a higher mesh count than the underbase—the underbase provides the foundation, and the highlight white supplies the final brightness and detail.
Using a Smoothing or Matte-Down Screen
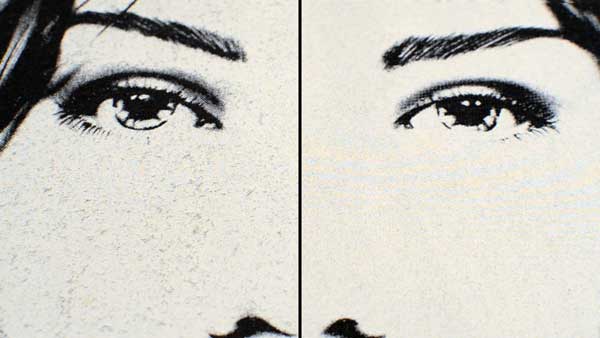
A smoothing screen helps flatten garment fibers and improve the surface of a flashed white underbase. The process commonly involves:
- Printing the white underbase.
- Flashing until the surface is gelled.
- Using a smoothing screen or heated smoothing system to press the ink and fibers down.
- Printing the next white layer or top colors.
|
|
Smoothing can improve surface finish, top-color brightness, white opacity, fine detail, fiber matte-down, and resistance to a fuzzy print after washing. It does not replace proper ink selection, screen setup, flashing, or curing—it is an additional process tool that improves results on fibrous garments.
Printability: Thick Does Not Always Mean Better
White inks are often judged by how thick they feel in the container, but bucket viscosity does not tell you how the ink will perform on press. A very thick ink may look highly opaque but require more squeegee pressure, slower print speeds, more aggressive flooding, lower mesh counts, or additional warm-up and mixing.
Excessive pressure can drive ink into the garment rather than leaving it on the surface—reducing opacity and roughening the print. The best white should loosen under squeegee pressure, clear the mesh, then regain enough body to hold its shape after printing.
Before switching inks, confirm the ink is at a reasonable working temperature and has been properly stirred. Cold plastisol often feels significantly thicker than the same ink at normal production temperature.
Short-Bodied vs. Long-Bodied White Ink
In addition to viscosity, white inks can be described as either short-bodied or long-bodied. Ink body refers to how the ink stretches, flows, and breaks—not simply how thick it feels in the container.
Short-Bodied White Ink
Short-bodied ink breaks cleanly and tends to stay where it is placed rather than stretching or stringing. This can make it easier to maintain sharp edges and fine detail because the ink is less likely to spread after the print stroke.
Short-bodied whites are often well suited for:
- Fine details and sharp edges
- Manual printing
- Shops that want an ink that requires less preparation
- Applications where controlling ink spread is important
- Printers who prefer a clean break from the squeegee and spatula
Long-Bodied White Ink
Long-bodied ink stretches and flows more when lifted with a spatula or moved by the squeegee. It may require more stirring, warming, or modulation before reaching its best printing consistency.
Once properly prepared, a long-bodied white can provide smooth coverage and work well in high-production environments, including automatic printing. However, its greater tendency to stretch or flow can require more control when printing fine detail.
Neither body style is automatically better for every job. The best choice depends on the artwork, press type, shop temperature, print speed, and the way the printer prefers the ink to move through the screen.
Flashing White Ink Correctly
White underbases are commonly flashed before additional colors are printed. The goal is usually to gel the surface enough for the next screen to print cleanly—not to fully cure the underbase during the flash step.
Overflashing can cause poor adhesion between ink layers, increased dye migration, excessive garment heat, shrinkage or distortion, a heavier or rougher surface, and longer production times. Underflashing can cause ink pickup on the next screen, smearing, poor detail, contaminated colors, and registration problems.
Flash time should be based on the surface condition and temperature of the ink, not a fixed number of seconds applied to every garment.
Curing White Ink Correctly
White ink often carries a heavier deposit than other colors, so it may need more heat energy to cure completely. Important cure variables include:
- Ink-deposit thickness
- Dryer airflow
- Chamber temperature
- Belt speed
- Garment temperature
- Garment moisture
- Total time under heat
Measure the temperature of the ink film whenever possible. Dryer display settings and surface readings may not show whether the deepest part of a heavy white deposit has reached full cure. Wash testing remains one of the best practical ways to confirm a production setup is working correctly.
The 24-Hour Polyester Test
Before starting a full polyester or blend order, test the complete production system:
- Use the actual production garment.
- Use the planned blocker, white ink, mesh count, and stencil.
- Use the planned print and flash settings.
- Cure at the planned dryer speed and temperature.
- Inspect the print immediately after cooling.
- Inspect again after 24 and 48 hours.
- Run a wash test when the size or risk of the order justifies it.
Testing is especially important for polyester, cotton/polyester blends, sublimated garments, fleece, fashion colors, overdyed garments, customer-supplied apparel, and new or unfamiliar styles. A test on a different shirt may not accurately predict how the production garments will perform.
White Ink Troubleshooting Chart
| Problem |
Likely Cause |
First Things to Check |
White develops a pinkish tint
|
Dye migration |
Garment type, temperature, dwell time and blocker requirement
|
White looks dull or gray
|
Deposit too light or ink driven into fabric
|
Mesh count, squeegee pressure, stencil and print stroke
|
White is difficult to print
|
Cold ink or mesh too fine
|
Ink temperature, stirring, mesh count and squeegee setup
|
Print cracks after washing
|
Incomplete cure
|
Ink-film temperature, dryer speed and deposit thickness
|
Underbase looks rough
|
Raised fibers or excessive pressure
|
Off-contact, squeegee pressure, flash and smoothing process
|
Top colors peel from white
|
Underbase overflashed
|
Flash time, surface temperature and adhesion between layers
|
White is showing through top colors
|
Underbase spread or registration issue
|
Artwork choke, stencil, pressure and registration
|
How to Choose the Best White Ink for Your Shop
Use this as a quick decision recap.
Choose a cotton white when you're printing primarily 100% cotton, dye migration is not a concern, and you want good fiber matte-down with a smooth, opaque, dependable everyday underbase.
Choose a low-bleed or low-cure white when you're printing cotton/polyester blends, performance garments, heat-sensitive apparel, fleece, or fashion garments, or trying to reduce dye migration. (Remember the callout above: confirm the ink offers both properties if your job needs both.)
Choose a polyester white when you're printing 100% polyester, athletic uniforms, or problem garment colors, or when greater bleed resistance—and possibly a blocker system—is needed.
Use a blocker when you're printing sublimated polyester, the garment dye is known to be unstable, a test print shows migration, white develops a tint after sitting, or a polyester white alone doesn't provide enough protection.
Final Buying Advice
When choosing the best white screen printing ink, begin with the garment. For cotton, prioritize opacity, smooth printability, fiber matte-down, and hand feel. For blends, weigh both low-bleed and low-cure performance. For 100% polyester, use a true polyester white and add a blocker when dye-migration risk is high.
Then match the ink to your production process. Mesh count, stencil thickness, squeegee pressure, print speed, off-contact, flash temperature, dryer settings, and ink-deposit thickness all affect how well any white performs.
The best white ink is not always the thickest, brightest, or most expensive. It is the one that prints consistently, provides the required coverage, cures fully, resists dye migration when needed, produces the desired hand, holds detail, and performs reliably after washing. With the right ink, garment testing, and press setup, white becomes less of a production problem and more of a dependable foundation for clean, professional prints.
Frequently Asked Questions
Why does my white ink turn pink after curing?
This is usually caused by dye migration rather than defective or undercured ink. Heat from flashing or curing activates the garment's dye—most often on red, maroon, navy, or overdyed polyester—and it migrates up into the white ink film. The tint can appear right away or develop over the following day. A low-cure white, a blocker layer, and reduced heat exposure all help.
What is the difference between low-cure and low-bleed white ink?
Low-cure describes the temperature the ink needs to fully cure. Low-bleed describes the ink's ability to resist garment dye migration. They are separate properties, and an ink can have one without the other. When a job needs both, confirm the specific ink provides both.
What mesh count is best for white screen printing ink?
It depends on the job. 86–110 mesh lays down a heavy, high-opacity deposit for bold prints and underbases. 125–160 mesh is the versatile middle ground for most underbases and spot whites. 180 mesh and higher gives thinner, smoother deposits for highlight white, fine detail, and halftones. Match the mesh to the ink, artwork, and deposit you want.
Do I always need a blocker under white ink?
No. Most cotton and many stable polyester garments don't need one. Reach for a blocker on sublimated polyester, garments with unstable or unknown dye, or any garment where a test print shows migration or a white that tints after sitting. Because a blocker adds deposit and hand, use it only when the garment risk justifies it.
Can I use the same white ink for both cotton and polyester?
Sometimes, but it's risky. A cotton white may not provide enough bleed resistance on polyester, and a polyester white may be unnecessary on stable cotton. Some FlexCure™ and multi-purpose whites cover a wider range, but you should still test each garment type before committing to a run.
Why does my white print look dull or gray instead of bright?
Usually the deposit is too light or the ink is being driven into the fabric rather than sitting on top of it. Check mesh count, squeegee pressure, stencil thickness, and print stroke. On fibrous garments, flashing and a smoothing screen can also raise brightness by flattening fibers and building a cleaner surface.
How do I know if my white ink is fully cured?
Verify the temperature of the complete ink deposit—not just the dryer chamber or belt setting—because a heavy white deposit can lag behind the surface reading. Use appropriate temperature-measuring tools to monitor the ink film, and confirm the production setup with a wash test. Undercured white may crack, wash out, or stay tacky.